Chúng ta từng biết Redis là một app dùng để làm server cache object files như là image, các file js, css, font v.v….mặc định của Redis sau khi cài xong là kết nối dạng TCP. Ở bài viết này mình tổng hợp cách cài đặt và chuyển kết nối từ TCP sang Unix Socket. Đặc biệt bài này hướng dẫn cho panel HestiaCP.
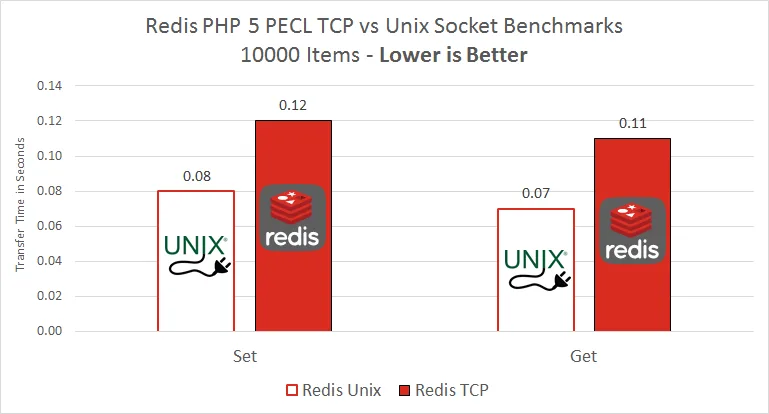
Theo kiểm định của một số chuyên gia thì kết nối Redis qua Unix socket cho tốc độ nhanh hơn 25% so với TCP.
- Cài đặt Redis sử dụng repo từ Redis thay vì mặc định của OS. Điều này giúp cài được phiên bản Redis mới hơn, các bản redis ở OS thường cập nhật chậm hơn bản từ chính redis. Chạy lần lượt các lệnh sau:
curl -fsSL https://packages.redis.io/gpg | sudo gpg --dearmor -o /usr/share/keyrings/redis-archive-keyring.gpgsudo chmod 644 /usr/share/keyrings/redis-archive-keyring.gpgecho "deb [signed-by=/usr/share/keyrings/redis-archive-keyring.gpg] https://packages.redis.io/deb $(lsb_release -cs) main" | sudo tee /etc/apt/sources.list.d/redis.listsudo apt-get updateapt install redis-server php-redissudo systemctl enable redis-serverTiếp theo ta tạo 1 linux group tên là redisgroup
sudo groupadd redisgroupSau đó chúng ta dùng nano để chỉnh sửa file redis.conf
sudo nano /etc/redis/redis.confSau đó chỉnh sửa file redis.conf với các thông số như sau:
# create a unix domain socket to listen on
unixsocket /var/run/redis/redis.sock
# set permissions for the socket
unixsocketperm 775
#requirepass passwordtouse
bind 127.0.0.1
daemonize yes
stop-writes-on-bgsave-error no
rdbcompression yes
# maximum memory allowed for redis
maxmemory 50M
# how redis will evice old objects - least recently used
maxmemory-policy allkeys-lru
requirepass yourpassword
Tiếp theo, chúng ta sẽ tạo file default.sh để file này tự động thêm user mới khi tạo vào group redisgroup
sudo nanon /usr/local/hestia/data/packages/default.shNội dung của file default.sh sẽ là:
#!/bin/bash
user=$1
usermod -a -G redisgroup "$user"
Tiếp theo chạy lệnh:
sudo nano systemctl edit redis.servicevà thêm vào file đó đoạn sau:
[Service]
Group=redisgroup
Kiểm tra file xem đã được tạo chưa:
cat /etc/systemd/system/redis-server.service.d/override.confNếu thấy hiện ra:
[Service]
Group=redisgroup
là đã thành công.
Bước cuối cùng, thêm mã sau vào file wp-config.php
define('WP_REDIS_SCHEME', 'unix');
define('WP_REDIS_PATH', '/var/run/redis/redis.sock');
define( 'WP_REDIS_PREFIX', 'yourdomain.com' );
define('WP_REDIS_PASSWORD', 'yourpassword');
Đoạn code trên cần được thêm vào mỗi website WP mới, chỉ cần bạn thay đổi yourdomain.com sang domain của site đó là xong, các phần còn lại giữ nguyên.
Bonus thêm một vài code trong file wp-config.php để tối ưu site, tăng bộ nhớ v.v…
define( 'AUTOSAVE_INTERVAL', 600 );
define( 'WP_POST_REVISIONS', 5 );
define( 'EMPTY_TRASH_DAYS', 21 );
define('WP_MEMORY_LIMIT', '256M');
define( 'WP_MAX_MEMORY_LIMIT', '512M' );
define('WP_DEBUG_LOG', false);
define('DISABLE_WP_CRON', true) ;
Bài viết này ko chú thích nhiều, chủ yếu note lại để mình làm cho nhanh về sau. Có thời gian mình sẽ trình bày lại rõ ràng hơn.
Bonus thêm tip tối ưu vps và website, bật Jit compiler cho php
/etc/php/8.2/mods-available/opcache.iniSau đó đổi opcache.jit=off thành on như sau:
opcache.jit=on
opcache.jit_buffer_size=64M
Lưu lại và khởi động lại php 8.2
systemctl restart php8.2-fpmNếu làm cho php8.4 hay phiên bản khác thì bạn đổi phiên bản tương ứng trong câu lệnh nhé.
Có thể cài thêm plugin atec Cache Info để xem có bao nhiêu kb được sử dụng bởi JIT.
Tối ưu MariaDB bằng cách edit file /etc/mysql/my.cnf và thêm đoạn sau vào cuối file:
innodb_flush_log_at_trx_commit=2
innodb_flush_neighbors=0
innodb_flush_method=O_DIRECT_NO_FSYNC
innodb_io_capacity=1000
innodb_random_read_ahead=ON
innodb_buffer_pool_size=1G
table_open_cache=4000
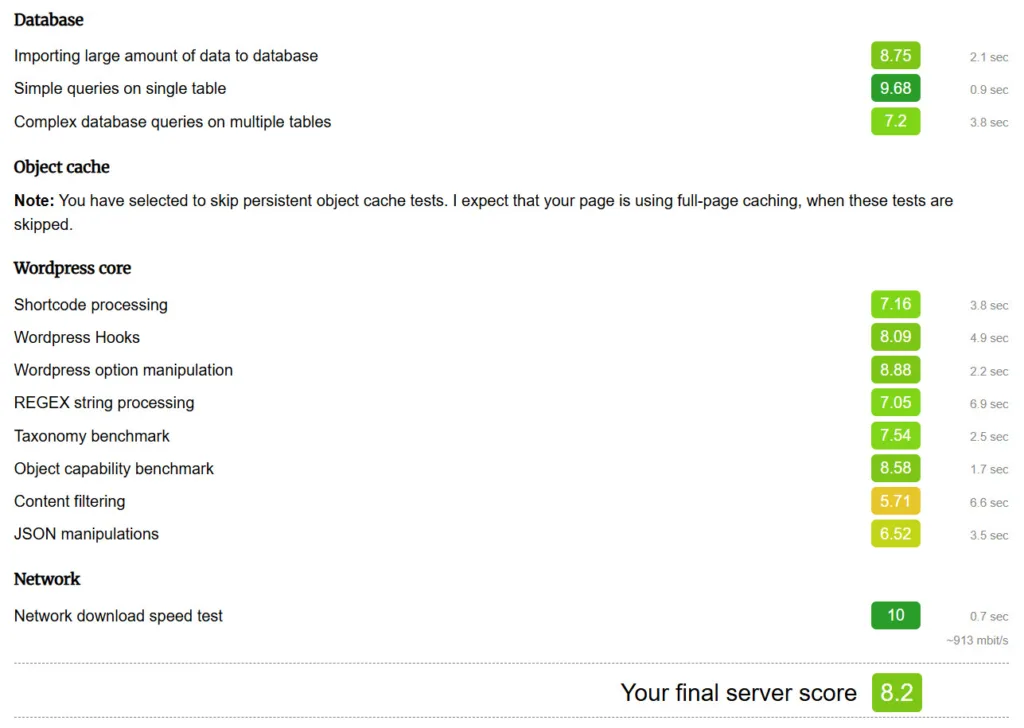
innodb_log_file_size=256MTrước khi tối ưu MariaDB bạn có thể cài plugin Hosting Benchmark tool để test và sau khi tối ưu test lại sẽ thấy điểm cao hơn.
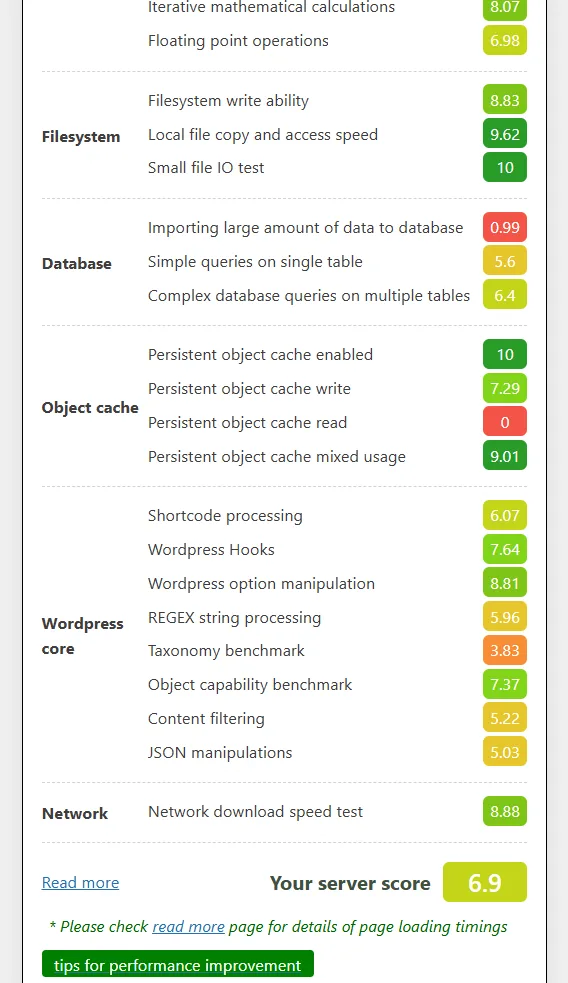
Sau khi tối ưu:
Leave a Reply